You recently launched your Shopify site.
You spent all night working on it.
Fueled by coffee and determination, you pressed the green button and it's now LIVE!

However, you look at your sales dashboard.
Your heart sinks into the floor.
0 sales.
A big, fat goose egg.
People are flocking to the site, but they don't seem to be ready to buy.
Here's the thing: most people don't go straight from visiting to purchasing. They browse, consider, and sometimes leave without buying. Sound familiar?
Don't worry—we've got you covered. Keep reading as we walk you step by step through creating a world-class retargeting strategy on Facebook to turn those visitors into loyal customers.
Let's get started!
What Does the Customer Journey Look Like?
Ever wonder what's going through a shopper's mind before they hit that "Buy Now" button? There's a journey every potential customer takes—a mix of discovery, curiosity, and decision-making. Each step offers an opportunity to connect, engage, and guide them closer to choosing your brand.
Let's take a closer look at the four stages that shape this journey:
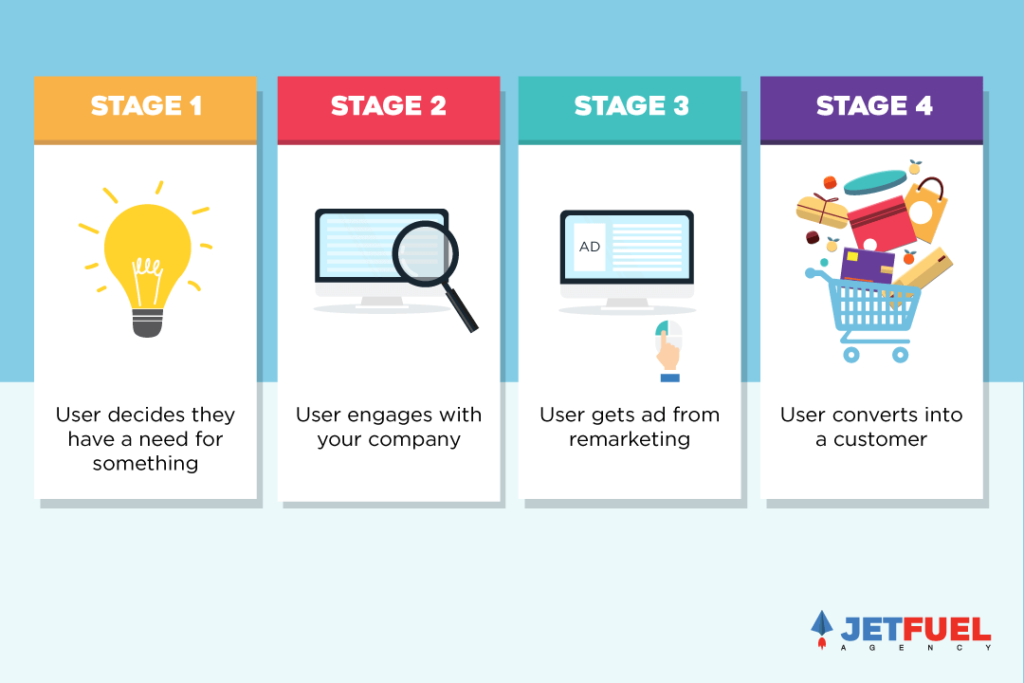
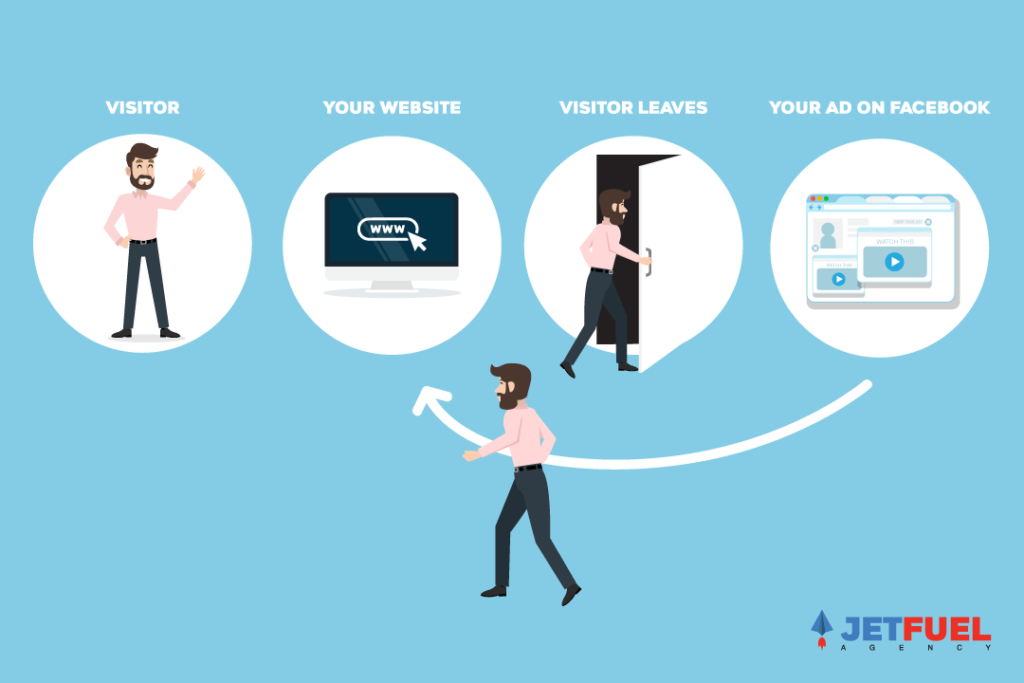
First, a user realizes they need something—Stage 1. They browse around, stumble onto your site, maybe check out a product or engage with your content. That's Stage 2, the first spark of interest.
Then they leave—no purchase, no sign-up. But all is not lost! This is where Stage 3, remarketing, comes in. Your ad appears, tailored to their journey: "Remember that delicious snack?" or "Don't miss your chance!" It's the gentle reminder they need to return.
Finally, Stage 4 happens—they convert. Remarketing turns fleeting interest into action, making sure your brand stays top of mind and nudges users toward becoming loyal customers. It's not magic—it's strategy!
But who are these users you're retargeting? Understanding their behavior and what holds them back is key to creating campaigns that convert. Let's meet them.
Who Is a Retargeted Customer?
Picture Beth—a potential customer who's interested but hasn't yet decided to make a purchase and become a loyal fan.
She clicked on your ad, explored your website, and then… left without buying. So close, yet so far.
Beth isn't alone. There are countless users just like her—curious, engaged, but hesitant.
To turn these near-misses into loyal customers, you need to truly understand them. What brought them to your site? What stopped them from buying? What message would resonate enough to convert them?
Strategic marketers (like you) don't leave this to chance. They analyze behaviors, segment audiences, and craft tailored campaigns that meet users like Beth where they are. But to do this effectively, you need to grasp where retargeting fits in the broader picture—the marketing funnel.
How Beth Moves Through the Marketing Funnel
Let's follow Beth's journey through the marketing funnel to understand how retargeting fits in.

Awareness: Where It All Begins
Beth's story starts when she realizes she has a need—let's say she's looking for healthy snack options. She's not familiar with your brand yet, so your broad campaigns introduce her to your product. A vibrant Facebook ad catches her attention as she scrolls, sparking curiosity about your delicious, all-natural snacks.
At this stage, the goal is simple: make Beth aware of your brand.
Engagement: Beth Takes a Closer Look
Intrigued, Beth clicks on your ad and explores your website. She browses product pages, checks out ingredients, and even follows your social media accounts for recipes and tips. She's not quite ready to buy, but she's interested.
This is where retargeting shines. You use tailored ads to re-engage Beth, showing her the products she viewed or offering a first-time discount to sweeten the deal. By keeping your brand front and center, you ensure Beth doesn't forget about you.
Purchase: Closing the Deal
Beth is now seriously considering making a purchase. She's added a few items to her cart but hesitates, wondering if it's worth it. This is the critical moment. Retargeting ads step in with the right message: a glowing testimonial, free shipping offer, or reminder of the items waiting in her cart.
The nudge works. Beth hits "checkout" and becomes a paying customer.
Repurchase: Building a Lasting Relationship
After a great first experience, Beth is likely to come back for more. Retargeting doesn't stop at her first purchase—it encourages her to return. Ads featuring complementary products or a subscription plan for her favorite snacks remind Beth that your brand delivers exactly what she loves.
Advocacy: From Customer to Brand Advocate
Beth now trusts your brand and tells her friends about her amazing experience. While retargeting plays a smaller role here, it can still remind Beth of referral programs or exclusive deals to reward her loyalty. This turns Beth into one of your best marketers.
Beth's journey through the funnel shows how retargeting is the glue that holds each stage together. It engages her at the right moments, addresses her concerns, and encourages her to take the next step—all the way to advocacy.
Now that we've mapped out Beth's journey, it's time to discuss how to build the perfect Facebook audiences to keep users like Beth moving through the funnel. Let's dive in.
How should our Facebook audiences look?
When creating these audiences on Facebook, you should think about the time of engagement and the type of interaction with your site, social media post or ad.
First, you can create audiences based on the time they engaged. So, you will have audiences for 7 Day, 14 Day, 30 Day, up to 180 Day retargeting.
Next, you can categorize the users by their actions. The categories for making the retargeted customer audiences will include:
- All Site Visitors
- Product Page Visitors
- Add to Cart Visitors
- Checkout Visitors
- Top 10% Time On Site
- PageViews – Frequency 2+
- Social Media Engagers
- Video Viewers
- Customer Lists
Segmenting by when and how users engaged helps tailor your messaging effectively.
A user who abandoned a product page within the last 30 days may respond to urgency or discounts, while someone who visited the homepage 3 months ago might need a broader reintroduction to your brand. Similarly, product page viewers need specific benefits, while post engagers may respond better to testimonials or social proof.
By aligning timing and actions with tailored messaging, you create a more relevant and conversion-focused experience.
How to Create a Facebook Retargeting Campaign Step-by-Step
Now that you understand how you should segment your audiences, let's see how to actually create those audiences in Facebook Business Manager.
Since these users engaged with your brand before, they already know the basics. They've been hit with previous ads, so it's time to get creative.
You want to create ads that are different for each audience day period (7 Day, 30 Day, etc.)
7 Day retargeting should have a different ad copy and creative than 14 Day, 30 Day and 60 Day.
Why? Imagine if you were getting retargeting ads for a candy bar company.
The same ad appearing 30 days straight would not convince you to buy a candy bar.
If anything, it gets annoying and turns you away.
You want to send a variety of quality ads over time, so the customer will be eased into converting.
Alright, you know the overview, now let's build it: step by step.
Step 1: Create the audiences on Facebook
- Log onto business.facebook.com
- Select Audiences from the top left meny under your account:
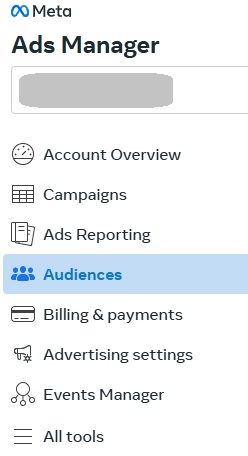
Here are the step-by-step instructions on building out each category of audiences for retargeted customers.
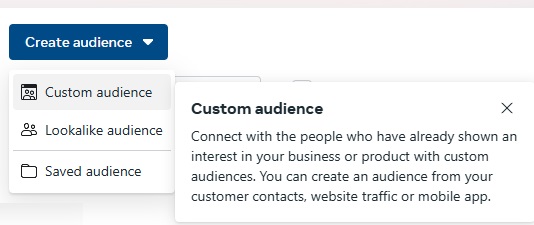
All Page Visitors (7 Day)
- Click "Create Audience"
- Select "Custom Audience"
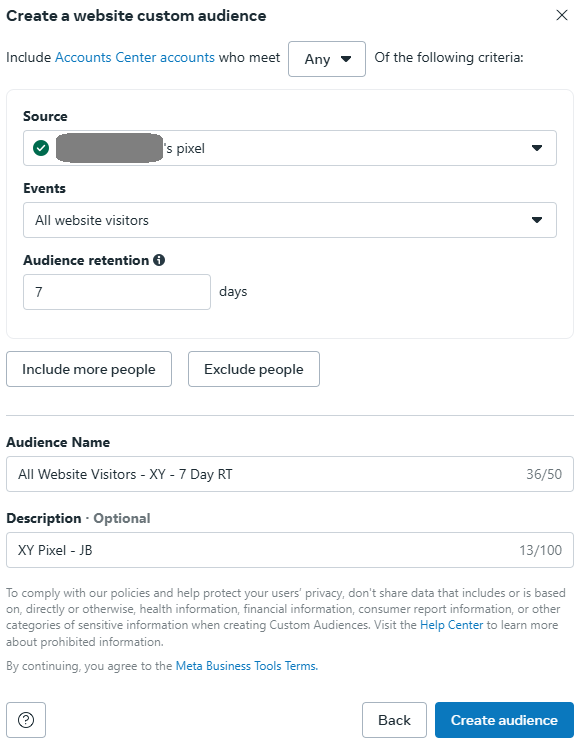
- Under Your sources, select "Website"
- Make sure the company's Pixel is selected
- In the dropdown menu under Events, select "All Website Visitors"
- Enter "7" under Audience retention
- Type in Audience Name: "Company Name 7 Day RT (Pixel)"
- (Optionally) In Description, type: "pixel – Your Initials"
- Click the 'Create audience' button
To create an audience of a different size:
- Repeat Steps 1-9 and change "7" day to the desired number of days.
All Product Page Visitors (7 Day) – (The URL depends on the company)
- Click "Create Audience"
- Select "Custom Audience"
- Under Your sources, select "Website"
- Make sure the company's Pixel is selected
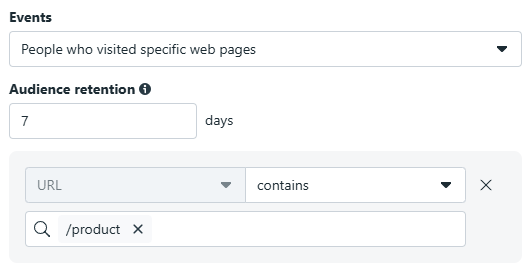
- In the dropdown menu under Events, select "People who visited specific web pages"
- Enter "7" under Audience retention, and refine by typing: "/product" under "URL contains"
- Type in Audience Name: "Company Name Product Page 7 Day RT (URL)"
- (Optionally) In Description, type: "product – Your Initials"
- Click the "Create audience" button
To create an audience of a different size:
- Repeat Steps 1-9 and change "7" day to the desired number of days.
All Add to Cart Visitors (7 Day)
- Click "Create Audience"
- Select "Custom Audience"
- Under Your sources, select "Website"
- Make sure the company's Pixel is selected
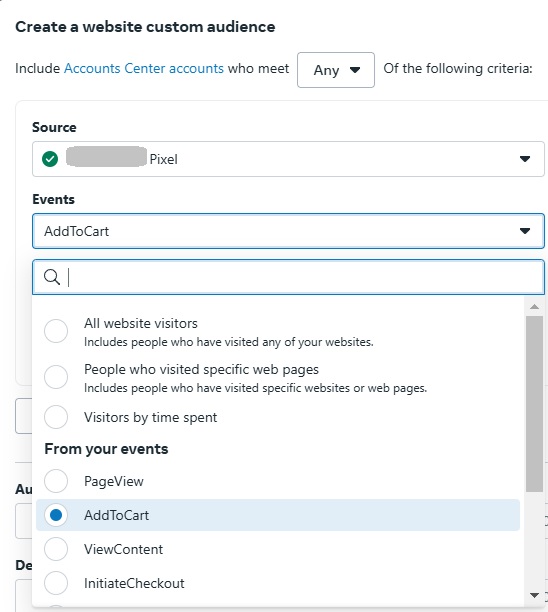
- In the dropdown menu under Events, select "AddToCart"
- Enter "7" under Audience retention
- Type in Audience Name: "Company Name Add To Cart 7 Day RT (Pixel)"
- (Optionally) In Description, type: "pixel – Your Initials"
- Click the "Create audience" button
To create an audience of a different size:
- Repeat Steps 1-9 and change "7" day to the desired number of days.
All Checkout Visitors (7 Day)
- Click "Create Audience"
- Select "Custom Audience"
- Under Your sources, select "Website"
- Make sure the company's Pixel is selected
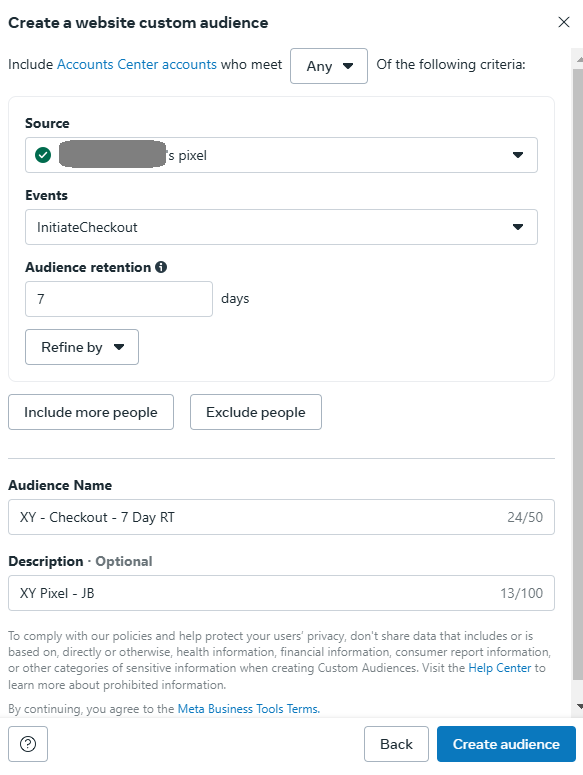
- In the dropdown menu under Events, select "InitiateCheckout"
- Enter "1" under Audience retention
- Type in Audience Name": "Company Name - Checkout 7 Day RT (Pixel)"
- (Optionally) In Description, type: "pixel – Your Initials"
- Click the "Create audience" button
To create an audience of a different size:
- Repeat Steps 1-9 and change "7" day to the desired number of days.
Top 10% Time On Site (30 Days)
- Click "Create Audience"
- Select "Custom Audience"
- Under Your sources, select "Website"
- Make sure the company's Pixel is selected
- In the dropdown menu under Events, select "Visitors by time spent"
- Enter "30" under Audience retention, and choose the "10%" in dropdown under Percentile
- Type in Audience Name: "Company Name - Top 10% Time On Site 30 Days RT (Pixel)"
- (Optionally) In Description, type: "pixel – Your Initials"

To create an audience of a different size:
- Repeat Steps 1-9 and change "30" days to the desired number of days.
PageView Frequency 2+ (30 Days)
- Click "Create Audience"
- Select "Custom Audience"
- Under Your sources, select "Website"
- Make sure the company's Pixel is selected
- In the dropdown menu under Events, select PageView
- Enter "30" under Audience retention, and refine by Frequency
- Choose frequency to be greater than or equal to "2"
- Type in Audience Name: "Company Name - PageView Freq 2+ 7 Day RT (Pixel)"
- In Description, type: "pixel – Your Initials"

To create an audience of a different size:
- Repeat Steps 1-9 and change "30" days to the desired number of days.
Boom. Now you know how to create all the different audiences needed for retargeted customers. On to the next one.
Step 2: Create the campaign
If you're new to Facebook marketing, here's an overview on what a campaign is.
A campaign tells Facebook what you're trying to accomplish, like "conversions."
There are various buying types and the most common is "auction." This type tells Facebook to send your ad based on how much you spend.
So if your budget is high, Facebook uses their algorithm to send your ads to the best performing audiences.
Moving forward, we have two different options for our ads: Advantage+ catalog ads (formerly known as DPA ads) or non-DPA ads.
What is DPA? It stands for Dynamic Product Ads.
DPA allows Facebook to use data and dynamically display products your user would most likely purchase.
This is effective for retargeted customers since they already browsed on-site, giving useful data.
Has this ever happened to you?
You're online shopping on your favorite clothing store and end up with a few items in your cart. You're not ready to purchase so you exit the site.
Few days later, you see the items in your abandoned cart pop up in a Facebook ad.
Yup, that's the magic of DPA.
However, there have been cases where retargeted customers react better to ads without DPA, so it's best to test both.
Here's a quick tip: When creating Dynamic Ads, you want to consider audience exclusions. With audience exclusions, you can set up targeting rules to avoid showing some products in your dynamic ads. This allows you to be very specific with who sees the ad and what they see.
Why is this important?
Exclusions are based on products in your catalog, allowing you to get specific with your audience.
For example, an audience exclusion can be made to target users who viewed products on your website but didn't purchase anything within the past 30 days.
Learn more about audience exclusions here.
Here are the steps to creating an Advantage+ catalog ads (formerly, DPA) and a non-DPA campaign.
Create Advantage+ catalog ads (DPA) campaign:
- Click on the green "+ Create" button

- Enter Campaign Name as something similar "Initials - Retargeted Customer - DPA - Initials"
- Keep buying type as "Auction" and change Campaign Objective to "Sales"

- Under Campaign details, turn on the Advantage+ catalog ads, and select your company's catalog:

Create a non-DPA Campaign:
- Click on the green "+ Create" button
- Enter Campaign Name as something similar "Retargeted Customer - NonDPA - Initials"
- Keep buying type as "Auction" and change Campaign Objective to "Conversions"
All steps are same as a DPA campaign, except for the Campaign Objective being "conversions."
Step 3: Set up your Ad Sets
An Ad Set tells Facebook who and what you want to target.
It's where you can set the spending amount and where the ad goes. This is where your audiences will be placed.
For our retargeted customer campaigns, our Ad Sets will include the different audiences like All Page Visitors, All Checkout Visitors, etc.
Remember, you want to create ad sets for DPA and non-DPA.
Create Advantage+ catalog ads (DPA) Ad Sets:
- Go to the Ad Set level and click on the green "+ Create" button. Make sure that your ad set will be made in the Retargeted Customer campaign that you are building from.
- Create a new ad set with each of the audiences that were made in Step 1: Create the Audiences on Facebook.
- Make sure that the Promoted Products have the correct Product Set that you want pulled from for your dynamic ads.
- Input the following structure for the name of the ad set: "Audience X Day RT + [18-65+] + M/F"
- "X Day RT" would be for 7 Day, 14 Day, 30 Day, up to 180 Day RT
- 18-65+ is for the different age targeting - you want to start with 18-65+ and then narrow down by what the data shows
- "M/F" is for Male and Female targeting - again you want to start with both unless we know that the brand is 100% sure that only one will "work"
- Once Step 4 is finished, you may "Skip Ad" and "Save to Draft"
- Add in the custom audience from Step 1: Create the Audiences on Facebook. An audience can be "Company Name Checkout 7 Day RT (Pixel)" audience.
You will need to create ad sets for the remaining time durations such as 14 Day, 30 Day, and 60 Day before the campaign is complete. Make sure you're excluding Purchasers audiences for the same time period as the targeted audience in each ad set. For example, exclude 14 Day Purchasers from 14 Day Checkout Abandoners ad set. Download the full list of audience exclusions here. - For optimization and delivery, make sure that the ad delivery is based off "Conversion Events." The event type is "Purchase."
The conversion window is 7 Day Click + 1 Day View or 7 Day Click, and the bid strategy for now is Lowest Cost. - Once updated, you may publish.
- Repeat Steps 1-9 and create separate ad sets for the rest of the audiences you created in Step 1: Create the Audiences on Facebook.
Create non-DPA Ad Sets:
When creating a Non-DPA ad set, you may follow steps 1-5 for DPA ad sets.
You will then continue with step 6: Make sure the Conversion Event Location is under "Website > Purchase"
7. Add in the custom audience from Step 1: Create the Audiences on Facebook. You will need to create ad sets for the remaining time durations such as 7 Day, 14 Day, and 30 Day in the future. Then exclude any purchasers audience for the same time period and the smaller window retargeting audience you're targeting in other ad sets. Download the full list of audience exclusions here.
8: For the placement targeting, the recommendation is to keep Advantage+ placements (formerly known as Automatic placements).
9: For optimization and delivery, make sure that the ad delivery is based off "Conversions." The conversion window is 7 Day Click + 1 Day View or 7 Day Click, and the bid strategy for now is Lowest Cost.
10. Once updated, you may publish.
11: Repeat Step 1-10 and create for the rest of the audiences.
Step 4: Create the Ads
We're almost done building our Facebook retargeting campaign.
It's time to create your ads.
Steps for creating ads:
- Go to the Ad level and click on the green "+ Create" button
- Make sure that the ad you're creating is set to the correct campaign and ad set
- You may create the ad with the following naming structure → "Ad_1"
- You may "save to draft"
- Now that you have made the outline of the ad, you may start to edit the ad.
- Look at the following for directions for the "Creative" section.
- You can continue to create the type of ad that is needed for the type of audience as well as the RT time period.
Remember, all time period retargeting should have different ads! Why?
This is important because if a user is hit with all the different day retargeting sections (7 Day, 30 Day, etc.), they will not see the same ad repeatedly. Each time they are hit with an ad, it should be increasing in information and hold more value in helping them convert.
While creating your ads, keep this checklist in mind to have the best quality ad possible.
Subsection Checklist for Ad Creation:
- Is there value in the text, headline, and description? Think value props, discount, offers, branding, and more.
- Is the URL correct?
- Did you input URL parameters in the tracking section? (utm_source, utm_medium, utm_campaign, utm_content)
- Once you've gone over the checklist you may publish and start running your ads for retargeted customers.

Wrapping Up: Your Retargeting Blueprint is Ready
You've done it! You now have all the pieces to build a Facebook retargeting campaign that truly works. From understanding your customers' journey to crafting tailored audiences and messages, every step is designed to turn casual visitors into loyal advocates.
Remember, retargeting is about persistence and strategy. By staying connected with your audience and addressing their needs at every stage, you’re not just chasing sales—you're building lasting relationships. Now, it's time to put this blueprint into action and let your efforts shine.
Dig Deeper:
How Food & Beverage Brands Should Use Facebook Retargeting in 2025
The Ultimate How-to Guide for Meta Retargeting for E-Commerce
